Christmas Pop Up Book

You may recall the Twas the Night Before Christmas Pop Up Book from last year that I made just for fun – to put my pop up skills to the test! I ended up giving it to my boss’s boss so her children could enjoy it. Maybe I’ll have to make one for my new niece and nephew this year 🙂

Well, thanks to my husband and the purchase of this fabulous product: The Silhouette Cameo, I have made the new and improved Christmas Pop Up Book version! My hands are happy that I’m finally putting the x-acto knife aside because the Cameo is my new best friend for paper-crafting

PROS:

  1. You can custom cut and print any design – I mean ANY design that you want
  2. You never have to buy a die cut cartridge or mess around with expansion packs
  3. You can download designs from their online store and automatically start printing right from your computer
  4. Online designs are endless and they are really cheap $0.50-0.90 per design.
  5. Their customer support staff are super friendly and they respond really quickly through email
  6. And again…you can CUSTOM create your own design and print out any font, style, shape, or image and it will cut it out perfectly and intricately.

CONS:

  1. It’s a little tricky to set up…there are white rollers on the sides that you have to slide to adjust the settings for smaller paper designs. These things are so difficult to budge the first time you try it! It finally worked for me when I discovered from another blog that wearing rubber gloves will help you grip them enough to twist the pinchers out of the notches.

* A NOTE to FELLOW ETSY SELLERS: Make sure that if you use the Cameo, you purchase the license for commercial use and avoid the designs that say “for personal use only” if you intend to use a copy-righted design in a product. You can, of course, create your own designs in the Silhouette Studio software that comes with it so that your original work can be used in your own products, but just make sure you don’t incorporate a personal-use-only design in a commercial product!

I actually purchased the Fiskars Fuse (die cut & letterpress combo set) on Black Friday. It was marked down to $179.99 from $299.99, so it was worth the price to try it out. But before I even took it out of its packaging, I came across a Cameo demo video on YouTube and instantly became awestruck.  I have since returned the Fiskars Fuse – as it doesn’t even compare to this machine. Most craft stores have this machine on sale right now $100 off – so don’t purchase it directly through Silhouette.com if you can help it.

Here is just a taste of some of the work the Cameo can do 🙂

christmaspopupbook1 christmas pop up book twas the night

christmaspopupbook2

christmas pop up book twas the night

christmas pop up book twas the night

christmas pop up book twas the night

christmas pop up book twas the night

christmas pop up book twas the night

christmas pop up book twas the night pop up santa

christmas pop up book twas the night

christmas pop up book twas the night pop up christmas tree

christmas pop up book twas the night

christmas pop up book twas the night

A Cute Thank You Note For My Pop Up Book!

As you may have seen, a few weeks ago I made the Twas the Night Before Christmas pop up book. It took me a really long time to finagle it all but when it was finally done, after posting a video and pics for this blog, I gave it to my boss to keep. She ended up reading it to her two young boys on Christmas Eve.

She said as soon as they were done reading the last line of the book, they heard Santa on the roof (her creative and fun-loving brother-in-law dressed in full costume)! I was so touched to receive their cute little thank you notes for the pop up book. This makes me want to go and start making many more! 😉

Thank you Luke and Noah Tellier!

Pop Up Card Tutorial: Make Your Own Card in 30 Minutes

After receiving a couple requests, I have  finally gotten around to creating my first tutorial. Now, please bear with me. It’s my first one and I hope that I can make them better over time. I was promising tutorials for some Christmas cards, but I always forget to photograph mid-card and end up snapping photos at the end to show the finished product.

A lot of the cards in previous posts definitely took a substantial amount of time. Maybe 2-3 hours? The Twas the Night Before Christmas pop-up book took about a week.

Well how about some instructions for how you can make a pop-up card in 30 minutes? Ok so maybe my title is a little misleading, because this one took me about 41 minutes, but still…it’s under an hour! Plus, I had to pause and take photos in the middle of it. I deliberately set a timer so I could figure out just how long it would take. Once you get the hang of making one, you develop a knack for it and can crank them out pretty quickly and efficiently (assuming you have all the right tools!).

Here is what you will need:

1. 12″ x 12″ card stock (3-4 different sheets) – it’s good to choose complementing colors and have a mix of solids and patterns. Try some of the card stock that I purchased below (on sale at JoAnn for $9.99 per pack of 48 sheets!)

Citrus Cardstock

citrus cardstock

2. You will need some paper punchers (Corner Punch and Desired Shapes) – I couldn’t find my corner punch so I rounded some corners by hand and eyeing it, but the corner punch is quick, easy, and precise. I also chose to use the star paper punch for some decor on the card.

Paper Punch

3. Scrapbook Glue or Double Sided Tape

4. Trimmer / Scoreboard

5. Paper Scissors

6. 12″ x 12″ poster board (optional) – I love using this stuff because it makes the cards hardcover and a little more polished looking.

How to Do It:

1. Cut the paper for the outside cover into 6 x 12″ and then in half so you have two 6″ x 6″ squares. (If you are using the 12″ x 12″ poster board, glue each separate 6″x6″ squares onto a separate piece of 6″ x 6″ poster board)

Trimmer Pop Up Card

2. For the front cover, select another piece of card stock paper and cut into 6″ x 6″ squares. Cut one of the squares into 5.25″ x 5.25″ and then corner punch.

3. You can add another strip of paper however you want for an accent. Simply cut it using your trimmer. In this case, I used a blue stripe 2″ x 6″.

4. Punch out your stars using your paper punch for however many you want and simply glue all the pieces onto the front as desired.

5. Use a fine tip sharpie to write the message that you want on the front.

Thank you pop up card

6. For the inside, use another piece of card stock and cut into 6″ x 12″ but DO NOT cut into 6″ x 6″

7. Score in the middle at the 6″ mark and fold

8. Glue the spread to the inside of the cover.

9. Select another color card stock for the inside. This will be the base of the pop up and you will use it for the pop up mechanism.

10. Fold the card stock in half, and cut into 6″ x 12″ then cut again so it is 5″ x 8″. Honestly, I usually just eye it, especially if I’m going quick, but if you don’t feel comfortable doing that, you can use your trimmer to measure and cut accordingly.

Pop Up Card How To

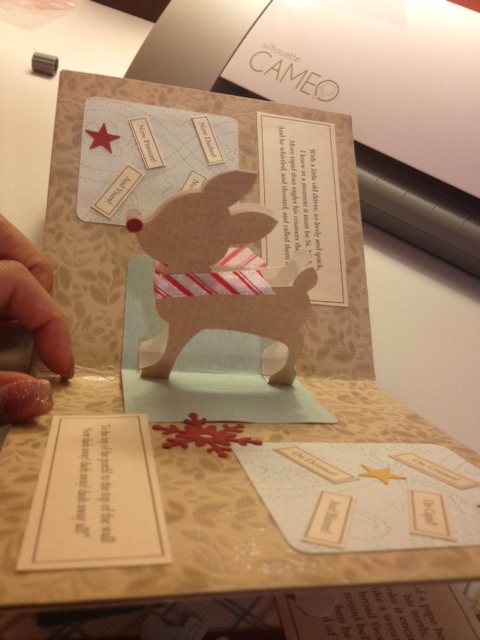
11. Now for the pop up. Draw the outline of your pop up boxes. This will create the same type of pop up that I used in the Christmas Pop Up Card showing the illusion of a pile of presents.

Pop Up Card Tutorial

12. Fold the 5″ x 8″ paper in half and use pencil to sketch the lines above, leaving about 1/2 cm in between each box and 1/4 cm from the edges.

13. Cut along the horizontal lines as shown above, being sure NOT to cut the vertical lines.

14. Fold your boxes in so that they are bent along the vertical lines and it looks like the image below.

Pop Up Card Tutorial

15. Open your pop-up and see the boxes / steps that are now created. You can now adhere this piece of paper to the card by using glue or tape.

How to Make a Pop Up Card

16. Next, cut out (or use a paper punch to cut out), your desired inside shapes. I folded paper in half and cut out hearts, but a paper punch is even quicker and more precise.

Pop Up Card

17. Adhere the shapes to your boxes wherever you want them.  I chose to cut out strips of paper to cover the front sides of my boxes (below).

Pop Up Card

I chose to cut slits in the front wall of my center box so I could insert and extra scrap piece of paper to make another image popping out further.

Pop Up Card

Pop Up Card How To

18. I then cut out a cloud / bubble shape and used it for a pop up “Thank you!” by folding it in half, handwriting the words on the front with sharpie and gluing it to the scrap piece of paper I had inserted as a support beam on the front center box.

Pop Up Card

19. I added a few extra hearts and some paper punched stars for a little extra something, and…voila! That was it.

Card Making

Pop Up Thank You Card

Pop Up Card

This might sound like a lot when you read all of this at first, but once you practice your first one, you’ll be able to crank out the same one over and over again pretty quickly. The hardest part for me when creating a new card is figuring out the design. What colors? How is it going to look? What is going to pop up? HOW is it going to pop up?

Sometimes it requires more than one instance of trial and error using practice models of computer paper. But once the design is mastered, you have your template to work off of and can re-use the same template for any other types of cards in the future. It makes card making a lot easier once you already have a basic recipe under your belt. You can use this same pop-up box mechanism for just about anything – a thank you note, a pile of Christmas presents, or maybe even a city skyline for a wedding invitation? 🙂 haha yes, I’m hinting at my own wedding that is now in the works. You might be seeing a pop up wedding invitation from me soon!! (Once we secure a date of course!)

Good luck scrappers!! Have a Happy New Year!!!

Pop-Up Girly Birthday Card

For one of my best friend’s 25th birthday, I decided to put together a very pink, girly, and cute looking pop up card.  Most of the embellishments I made myself, but some were purchased and made by Jolee. The paper was actually a Target brand (very cheap) and not from my typical Stampin Up collection. They sell packs of metallic and pink colored-palette paper for less than $10. I’d definitely recommend checking out their scrapbook section for paper the next time you are there. But my usual go-to location is JoAnn Fabric or ordering from Stampin Up.

This card uses a V shaped pop up as the mechanism. Again, I will show you a how to for both the V shape and L shape in a tutorial that I am still putting together. Hope you enjoy this!

Have a beautiful day!

Pop Up Birthday Card

Pop Up Birthday Card

Pop Up Birthday Card

Get Well Soon: Holiday Pop Up Card

At our office, one of our co-workers has been out on medical leave right before Christmas. To cheer him up over the holidays, I made this get well soon pop up card / book and had everyone in our office sign it to offer him their greetings. This was sent to him right before the holiday weekend. I hope he enjoyed it! There is a video of the card below.

Hope everyone had a safe, healthy, and joyous holiday!

Get Well Soon Pop Up Card

Get Well Soon Pop Up Presents

Pop Up Christmas Tree

Get Well Soon Pop Up Santa

Get Well Soon – Holiday Theme Pop Up Card

Pop-Up Card: Poinsettia

Here is a pop-up card that I created for my grandmother. It is a 4 page spread of little pop-up surprises! I have some similar looking scenes from other cards that I have already displayed in other posts, so I won’t repeat those here, but I would like to showcase the pop-up poinsettia!

The card background is simple, as I wanted to keep the focus on the flower. I created the petals by cutting out narrow heart shapes and then layering small ones on top of 2 large ones. I added the green petals at the end to add some contrast (and make it look more like a flower) and just slipped them under the large petal base and secured with glue. The cardstock is by Stampin’ Up, and the little snowflake was created using a paper punch. I thought it would add an extra wintry touch.

Have a lovely afternoon!

Poinsettia Pop Up

Pop Up Poinsettia

Pop Up Poinsettia

Twas the Night Before Christmas: Pop Up Book Photos

A couple days ago I did the video for this pop-up book I created, but here are some pics of the whole thing, scene by scene. This one took me about a full week to put together and some of the scenes took more than one trial run. It was tricky trying to figure out the design and mechanism for some of the pop-ups. I practiced some of the cut outs on computer paper that I took home with me from the recycling bin in my office.  I was determined to use only my left over scraps from holiday card-making and not buy new paper for this project.  A couple of stickers (made by Jolee) are also left over from card-making. I will admit that I did need 1 additional sheet of black cardstock paper in order to finish the cover, but other than that, this project was made entirely from scrapbooking and cardmaking scraps and left over paper. For all of you who love scrapbooking and paper crafts as much as me, remember to make good use of all of your paper and don’t let your scraps go to waste.  I hope you like it!

Twas the Night Before Christmas Cover

Twas the Night Before Christmas Cover

Pop Up Twas the Night Before Christmas

Twas The Night Before Christmas Children

Pop Up Visions of Sugar Plums

Pop Up Winter Trees

Pop Up Winter Trees

Pop Up Trees

Pop Up House

Twas the Night Before Christmas Pop Up

Twas the Night Before Christmas Pop Up Reindeer

Pop Up Reindeer

Pop Up Santa

Twas the Night Before Christmas Pop Up

Twas the Night Before Christmas Pop Up

Twas the Night Before Christmas Pop Up

Pop Up Christmas Tree

Twas the Night Before Christmas Pop Up

Twas the Night Before Christmas Pop Up

Twas the Night Before Christmas Pop Up

Made from this pile of scraps:

scrapmess

Happy Holidays!